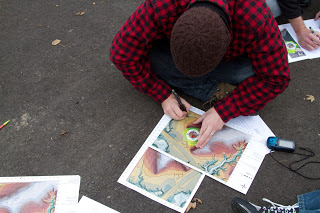
This week I practiced using a compass and map as a navigation technique. This lab is a follow up of the Field Activity 5. During this lab, our class was divided into group of 3. Each group chose a group member's map from field activity 5 to use to navigate with during this activity. Our professor began by giving us a set of points in which we had to locate. The methods and results for this are detailed below.
Methods
Once we arrived at the Priory, we all collected our individual maps. We were then instructed to plot 5 different latitude and longitude coordinates on our map. To plot these, I looked at the grid on my map. I used this latitude and longitude values measure where this approximately are located. The map we used contained a 50 meter UTM grid, which included 25 meter tick marks to help plot the points.
Next, we connected these points with a straight line using a ruler, as seen in figure 1. In order to navigate to each sequential point, we were required to measure the angle from due north in which we were to travel from the previous point. We did this by pointing the north arrow of the compass north as indicated by the map compass, and twisting the compass so that the angle degree was equal in line with straight line path, as seen in figure 2. This gave us 5 different angles.
 |
| Figure 1: This is a picture of me connecting the navigation points together, to create an intended navigation path to follow. |
 |
| Figure 2: This is a picture of Peter determining the angle we should orient from due north at each navigation point. |
Next, using the maps scale bar, we had to measure of the distance between each point. This allowed us to determine how many step would need to be taken, by solving for X using the conversion ratio of how many steps our pacer takes over 100 meters.
We began navigating by locating our first point. This was along the trail, and was marked by orange tape, making it readily visible. Holding the compass up to our chest, we rotated it in the angle previously determined and marked on our map. The person holding the compass oriented the pacer in the direction indicated by the compass. The pacer then walked the amount of steps previously determined to get to the next point. Although we did not use a GPS to navigate, we had a GPS on hand gathering a track log of our navigation.
 |
| Figure 3: Track log data collected in the UW- Eau Claire Priory while navigating with a compass and map. |
Metadata:
Who
|
Ally Hillstrom,
Peter Sawell, David Leifer
|
What
|
Track Log
|
When
|
Collected on Monday,
October 26th
|
Where
|
The UW-Eau Claire’s
Priory. Eau Claire, Wisconsin
|
How
|
Track log data
collected using juno GPS unit from the UW-Eau Claire Geography Department,
while using a compass and map technique to navigate.
|
Discussion
During this activity, we were forced to rely on maps to determine accurate measures with our compasses. We used Peter's map, which was helpful in many aspects. The map was useful in that it allowed us to first plot the latitude and longitude points mostly accurate because it contained a 50 UTM grid. This small grid interval made it easy to estimate where the point should be, however, this could have made more accurate if the grid contained tick marks in between the 50 meter intervals. Additionally, he decided to include a LiDAR Basement, which provided helpful elevation information. He also add a trail feature class, which helped us to locate the first point on our map because it was located on the trail. Navigating to each location was difficult because they were unmarked and required the pacer to walk straight through whatever terrain was in the path. Our pacer, Peter, was determined to stay on this track as much as possible however at times it proved this ideology is next to impossible. Along the track there were piles of disposed metals in the wood, as well as trees that required us to navigate around, which could count for the reason we were slightly off at each navigation site. We determined we readily found 4 of the 5 navigation points without the use of the GPS. The one were did not find as easily was unlabeled. This made it clear that if you are navigating, it is much easier to navigate there knowing what your target looks like. Without it, you must rely on the maps spatial cues. On our map, the I relied on the LiDAR elevation to know if the point would be in a high or low elevation within the area.
Conclusion
This lab highlighted what components of a map are helpful for navigating with solely a compass and a map. It became clear that this method of map and compass navigation has variable success, which is mostly dependent on the accuracy and quality of your map. The lab helped to identify which map components should be included when navigating with this method.
No comments:
Post a Comment