Sunday, November 29, 2015

Field Activity #8: Collection GPS data with the ArcCollector Mobile App

Introduction
During the field activity, we took advantage of the high functioning of the gps unit and wifi or data connection within a smart phone to create a data collection platform. Surprisingly, many smartphone devices have higher computing power and accuracy than a variety of standard GPS units. Within this lab, we experimented with the ArcCollector app on our personal smartphone devices to create a data collection project. The methods I used to set up my data collection project are detailed below.

Methods
I began this lab by designing a data collection theme. I first began by designating my study area as the UW-Eau Claire campus. In class we first made a practice geodatabase. Originally I was going to do bird sightings and collect data based on this, however after entering domains in such as the species, behavior, and tree type, and observing the bird activity on campus I realized this would be difficult to complete a full data set. After this attempt, I decided I would rather sample stationary object on campus. I chose to survey how many garage disposal bin were paired with a recycle bin, to determine if more recycle bins could be placed around campus. I began by creating a geodatabase in ArcCatalog, along with creating domains, their properties, and optional values. I began by creating my domains of Bin Type, Date, Label Status, Paired, Status, Temp, Time, and Weather (seen in figure 1). I gave a description to each of these to define the domain's definition. While creating each domain, I was required to designate what field type the domain should be classified as, such as text, float, date, double, and short or longer integer. For the text fields, such as Bin Type, I was able to select a coded value domain type. This allowed me to set up selectable options within in domain, for example within Bin Type, I was able to created Recycle or Garage as two separate selected options. Once these domains were created for the geodatabase, I created a feature class called disposal bins. For this feature class, I was able to add domains to the feature class that I had previously created for the geodatabase (seen in figure 2). Once the set up of the geodatabase was complete, I was able to upload to ArcGIS online.

Following the tutorials on the esri website, beginning at Publish your data, I set up my project to be published on ArcGIS online. Once I completed this step, I followed the tutorials on the esri website to Create and share a map for data collection. The steps allowed me to create the map online, such as add a basemap, and organize which order I wanted my domains to appear in my ArcCollector app on my phone. Once I shared my map, I was able to sign into the app on my phone and open the map. The following week I went out a collected a total of 38 data points, and displayed them using ArcMap (figure 3)  In figure 3, the data points are symbolized based on if the garage bin was or was not paired in figure 3.


Figure 1: Database properties window that shows the domain type I created within my geodatabase, along with their description. Within this window, I can specify the domain's field type, domain type, and coded values.

Figure 1: Feature class properties window that shows the domain type from my geodatabase that I added to the feature class. Their data field type is also specified.


Figure 3: Map of garage disposal bins paired or not paired with recycling bins.

Metadata:
Who
Ally Hillstrom
What
ArcCollector GPS Survey
When
Collected on Tuesday, November 17th
Where
The UW-Eau Claire’s Campus Mall.. Eau Claire, Wisconsin
How
GPS Points collected using ArcCollector app on personal Samsung Galaxy 4


Discussion
After completing these data collection methods, it appears that using a smartphone to collect geospatial data is a sound alternative to using a standard GPS unit. Although as a beginner the process of publishing and creating the map on ArcGIS online was somewhat tedious, the process would be much faster and easier the second time around. Once the domains and online map is created, the process of collecting data with your smartphone is user friendly.  Surprisingly, my phone altered me if my accuracy was high, before I took a point, which was a helpful feature to have. However, referring to figure 3, it is clear a few points are inaccurate, however it is likely my data connect was not strong in these locations. It is apparent the points that are inaccurate are close to buildings. If I were to do this survey again, I would be conscious of this and wait at these locations for a longer period of time in an attempt to increase the accuracy of these points. Also, if I were to do another survey like this again, I would make sure to observe what I was collecting data of before I created the domains. As I was surveying, I noticed a few details that I would like to have added to my domain list, such as the orientation of the label on the bin. I would not have know to include this before observing the bins in person. Overall, I would recommend this method of surveying GPS points if you are in an area where your smartphone has either strong data or wifi connection. Thankfully, the wifi connection is strong across campus, aside from the outside of the buildings, which allowed me to take relatively accurate GPS points. If the accuracy of the survey was more critical however, I would like to compare accuracies amongst other survey units before making the final decision on my survey technique.

Conclusion
During this activity, I practiced how to use a smartphone for Geospatial data collection. The process was user-friendly and required minimal data collection time. Knowing smartphones are becoming increasing popular, the lab suggests that this technique may be a more practical, actuate, and less time consuming way to collect geospatial data.

Sources
http://doc.arcgis.com/en/collector/android/create-maps/create-and-share-a-collector-map.htm
http://doc.arcgis.com/en/collector/android/create-maps/prepare-data-desktop.htm

Sunday, November 22, 2015

Field Activity #7: Topography Survey

Introduction:
During this activity I practiced using survey grade equipment to gather topography data. of my study area of the University of Wisconsin-Eau Claire Campus Mall. Our goal was to collect 100 GPS points that include a coordinate grid location and elevation data, and process them in ArcMap to display the elevation through the survey site. The method used to collect this data are detailed below.

Methods:

Dual Frequency Survey: 
For this lab we began by choosing a survey area of about 25m x 25m. My partner Morgan and I choose to survey the UW-Eau Claire campus mall. I began our survey process by establishing our own wifi hotspot by using a Version 4g MiFi unit. Next, we began configuring the Telsa. During this, we used the Magnet application however because of technical difficulties we were forced to use the demo mode. Although the functionally of the GPS survey was unaltered, we were only allowed to store 25 points per "job". This required us to make 4 different jobs. Within each of these, we specified the configuration for the GPS survey, such as the projection (UTM Zone 15N), datum (NAD 83 [2011]), and grid as the coordinate type . After this, we clicked on the Connection tab. Within here we were allowed to Bluetooth to the Topcon Hiper SR RTK. After this connected, we clicked on the Survey tab. From here we selected Topography, which brought us to a screen that allowed us to take GPS points.

From here we were able to set up the tripod. The Topcon Hiper was located on top of the pole, and the Tesla was locked into a extended arm in the middle of the pole. Looking at our area, we sectioned it in roughly 4 equal parts and took 25 points in each. At each location we decided to take a point, we leveled out the tripod using the attached level. Once the tripod was balanced we saved the point. We repeated this process 100 times to end with 100 GPS points.

After the survey was complete we disconnected the Tesla from the Hiper and went inside to export the data. To export the data we saved it on a jumpdrive. The file format was saved as a text file, which we were able to view on the computer in the Notepad application. In order for our data to be organized correctly in Arcmap, we were required to edit the header of the Notepad document. I chose to label the header with: Name, Long(X), Lat(Y), Elev(Z). I also chose to copy all the data into one document. Both of these change made it easier when importing the data into ArcMap. To display the data I selected display XY data, followed by Export Data. The GPS points can be seen display in figure 1. Next, to display the elevation of this study area, I ran the Natural Neighbor tool. The output is displayed within figure 2.


Figure 1: The 100 GPS points take in the University of Wisconsin-Eau Claire Campus Mall using the Topcon Telsa and Topcon Hiper.

Figure 2: This figure displays the 100 GPS points take in the University of Wisconsin-Eau Claire Campus Mall using the Topcon Telsa and Topcon Hiper, and the natural neighbor output ran on the point feature class. This output displays the area's elevation data in meters.
 
Total Station Survey:
For this lab we went to the same location of the UW-Eau Claire Campus mall, used within the Dual Frequency Survey. I began our survey process by establishing our own wifi hotspot by using a Version 4g MiFi unit.  Next, we began configuring the Telsa. During this, we used the Magnet application again and located to survey to begin a topography survey, while setting up a job the with the same settings as the Dual Frequency survey above. Using the Telsa and Topcon Hiper, we took three separate gps back sight points which will be used to set the north bearing for the total station. Next we set up the Total Station at our point of origin. This required a lot of small adjustments to balance the equipment. Once this was step up, we powered down the Telsa to Bluetooth it to the Total Station, however the Telsa would not turn back on. This forced us to come out a different day to survey the remain 22 survey points. The following week we resumed our survey using the Total Station. To take each point, my job was to focus the lens to the reflector that my team member Grant was holding. He staggered himself in 22 different locations with our survey area. After our job was full of 25 points, including the Occupy Point (Origin), and the three back sights, we headed indoors to export the data on a jump drive. This allowed us to download the data on a flashdrive and save it as a text file. Once again, I edited the textfile heading, and imported the points into ArcMap. The displayed Total Station GPS point can be seen in figure 3. My next step was too run the Natural Neighbor tool in ArcMap to generate a DEM for this survey. The results can be seen in figure 4.

Figure 3: The 25 GPS points taken in the University of Wisconsin-Eau Claire Campus Mall using the Topcon Total Station.

Figure 4: This figure displays the 25 GPS points take in the University of Wisconsin-Eau Claire Campus Mall using the Topcon Total Station, and the natural neighbor output ran on the point feature class. This output displays the area's elevation data in meters.

Metadata (Dual Frequency):
Who
Ally Hillstrom, Morgan Freeburg
What
Survey Grade GPS Survey (Dual Frequency Survey)
When
Collected on Tuesday, November 10th
Where
The UW-Eau Claire’s Campus Mall, Eau Claire, Wisconsin
How
GPS Points collected using Topcon Hiper and Topcon Telsa, along with Verison MiFi unit to create a hotspot.

Metadata (TotalStation Survey):
Who
Ally Hillstrom, Grant Muehlhauser, and Matt Brueske
What
Survey Grade GPS Survey (Total Station Survey)
When
Collected on Tuesday, November 16th
Where
The UW-Eau Claire’s Campus Mall, Eau Claire, Wisconsin
How
GPS Points collected using Topcon Hiper and Topcon Telsa, TotalStation, along with Verison MiFi unit to create a hotspot.


Discussion:
This assignment gave insight into two different ways of completing a topography survey. The dual frequency survey was a much faster way of surveying, at least for a beginner, because the set up required less time than the Total Station. The Total Station requires much more practice and time to set up, because you must have the equipment perfectly balanced. The environment also would influence the type of survey technique you would want to use, because it would be very difficult to balance the Total Station survey if you are surveying on top of sand, which is likely to move under the equipment.

When comparing Figure 2 and Figure 4, the Dual Frequency output appears to have displaying the DEM more accurately however we took 100 points for this survey, compare to only 25 points in the Total Station survey. If I were going to redo these surveys,  I would like to survey with the same amount of points with each technique, in the same size area. Figure 3 and 4 make it clear that there are gaps in the Total Station survey where additional survey points could have been taken. Knowing there were a few open areas in the data, I chose natural neighbor knowing it uses the closest input samples and applies weights to them based on their proportion of area. This interpolation also fit to boarder of my data points, unlike others such as spline that extended the interpolation to other areas without data points. Running these interpolations made it clear that it is necessary to have points equally displaced through out the survey area. Although my data isn't in depth enough to comment of the accuracy of each method, according to the College of Engineering at the University of Saskatchewan, the total station method is less accurate than the dual frequency methods. It is also important to keep in mind that the Total Station requires at least two people to complete the survey, where the dual frequency survey could be completed independently.

Conclusion:
During this lab, we practiced completing a dual frequency and Total Station topography survey. This gave an experience with setting up the configurations of the equipment before surveying, surveying with each techinique, and manipulating and interpreting the data in ArcMap, and comparing the outputs of the two survey techniques.

Sources:
page 256: http://www.engr.usask.ca/classes/CE/316/notes/CE%20316%20Ch%207%209-3-12.pdf
http://resources.esri.com/help/9.3/arcgisengine/java/gp_toolref/spatial_analyst_tools/how_natural_neighbor_works.htm

Sunday, November 1, 2015

Field Activity #6: Navigating with a Map and Compass

Introduction
This week I practiced using a compass and map as a navigation technique. This lab is a follow up of the Field Activity 5. During this lab, our class was divided into group of 3. Each group chose a group member's map from field activity 5 to use to navigate with during this activity. Our professor began by giving us a set of points in which we had to locate. The methods and results for this are detailed below.

Methods
Once we arrived at the Priory, we all collected our individual maps. We were then instructed to plot 5 different latitude and longitude coordinates on our map. To plot these, I looked at the grid on my map. I used this latitude and longitude values measure where this approximately are located. The map we used contained a 50 meter UTM grid, which included 25 meter tick marks to help plot the points.

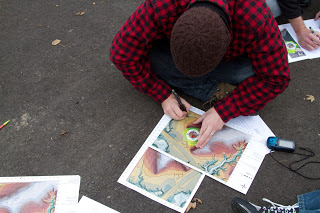
Next, we connected these points with a straight line using a ruler, as seen in figure 1. In order to navigate to each sequential point, we were required to measure the angle from due north in which we were to travel from the previous point. We did this by pointing the north arrow of the compass north as indicated by the map compass, and twisting the compass so that the angle degree was equal in line with straight line path, as seen in figure 2. This gave us 5 different angles.

Figure 1: This is a picture of me connecting the navigation points together, to create an intended navigation path to follow. 

Figure 2: This is a picture of Peter determining the angle we should orient from due north at each navigation point.

Next, using the maps scale bar, we had to measure of the distance between each point. This allowed us to determine how many step would need to be taken, by solving for X using the conversion ratio of how many steps our pacer takes over 100 meters.

We began navigating by locating our first point. This was along the trail, and was marked by orange tape, making it readily visible. Holding the compass up to our chest, we rotated it in the angle previously determined and marked on our map. The person holding the compass oriented the pacer in the direction indicated by the compass. The pacer then walked the amount of steps previously determined to get to the next point. Although we did not use a GPS to navigate, we had a GPS on hand gathering a track log of our navigation.

Figure 3: Track log data collected in the UW- Eau Claire Priory while navigating with a compass and map.

Metadata:
Who
Ally Hillstrom, Peter Sawell, David Leifer
What
Track Log
When
Collected on Monday, October 26th
Where
The UW-Eau Claire’s Priory. Eau Claire, Wisconsin
How
Track log data collected using juno GPS unit from the UW-Eau Claire Geography Department,  while using a compass and map technique to navigate.

Discussion
During this activity, we were forced to rely on maps to determine accurate measures with our compasses. We used Peter's map, which was helpful in many aspects. The map was useful in that it allowed us to first plot the latitude and longitude points mostly accurate because it contained a 50 UTM grid. This small grid interval made it easy to estimate where the point should be, however, this could have made more accurate if the grid contained tick marks in between the 50 meter intervals. Additionally, he decided to include a LiDAR Basement, which provided helpful elevation information. He also add a trail feature class, which helped us to locate the first point on our map because it was located on the trail. Navigating to each location was difficult because they were unmarked and required the pacer to walk straight through whatever terrain was in the path. Our pacer, Peter, was determined to stay on this track as much as possible however at times it proved this ideology is next to impossible. Along the track there were piles of disposed metals in the wood, as well as trees that required us to navigate around, which could count for the reason we were slightly off at each navigation site. We determined we readily found 4 of the 5 navigation points without the use of the GPS. The one were did not find as easily was unlabeled. This made it clear that if you are navigating, it is much easier to navigate there knowing what your target looks like. Without it, you must rely on the maps spatial cues. On our map, the I relied on the LiDAR elevation to know if the point would be in a high or low elevation within the area.

Conclusion
This lab highlighted what components of a map are helpful for navigating with solely a compass and a map. It became clear that this method of map and compass navigation has variable success, which is mostly dependent on the accuracy and quality of your map. The lab helped to identify which map components should be included when navigating with this method.